After aligning and selecting the frames for stacking you will enter the Stacking-page. Before you start stacking you can change several settings.

This shows the bar with the general functionality for stacking. When entering the stacking stage the STACK button has a green line under the button showing that this is the main function to be used. If you used colour images the colour checkbox will be on, if you used special files to use as a luminosity layer the LRGB checkbox will be on. You can stack in B/W by simple unchecking colour. The show stacklist/show stackgraph are typically used before actual stacking to change for instance the number of frames used. Show alignsections will show you which area of the image belongs to a certain alignpoint. You can disable alignpoints at this stage. Show full Image will - as on all RegiStax stages - show the whole image. Resample and Drizzling are like in previous versions of RegiStax available to enlarge your images. Drizzling uses a completely renewed method.
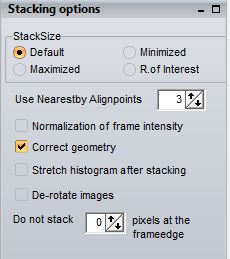 Stacksize
The stacksize will determine the final size of the stacked image. By default the stacked image will be the same size as the originals. If you choose minimized stacking will be limited to the area that is visible on all frames. For sequences with large amounts of shifts this will create quite a smaller final image but the advantage is that all pixels will be having the same amount of frames stacked. Maximized stacking does the opposite, based on the shifts of all frames the stacked result will show the largest possible image based on the sequence. Pixels on the edge will probably have less frames used to create them and might show up noisy. R.of.Interest stacking is normally used in conjunction with the setting of an ROI during aligment. If that was not done ROI stacking is the same as Minimized stacking.
Use nearestby Alignpoints
In all previous multi-alignpoint versions of RegiStax stacking of pixels was based on the recorded shift (alignment) from the nearest alignpoint. If the shift of 2 alignpoints that were bordering each other was quite different this could easily lead to "seams". RegiStax 5 had a special "feather" routine to clear those seams. In this version of RegiStax we use a different approach, for each pixel we can calculate the expected shift based on several (up to 4) nearestby Alignpoints. Under most conditions this will make the need to use a feather to clear the seams unnecessary, thats why RegiStax 6 has no feather method. The default setting of 3 is probably good to keep, if you would set this parameter to 1 you will stack in the same fashion as RegiStax 5.
Normalization of frame intensity
When your images fluctuate a great deal in intensity and you used Lowest quality or Frames/Apoint during limiting of the number of frames to be stacked this setting could be helpfull
Correct geometry
In previous versions of RegiStax the geometry (location of alignpoints on the stacked image) was based on the image that was used to set the alignpoints. In RegiStax 6 we (by default) can stack based on the average location of alignpoints.
Stretch histogram after stacking
When the stacked result looks rather dim or if you expect the image to be rather dim due to dark original files you can use this option to stretch the histogram after stacking. This will ensure that the darkest pixel after stacking has value 0 and the brightest value 255.
De-Rotate Images
This should only be used when alignment was also done with de-rotation. It will stack images based on the estimated rotation (only 2 alignpoints).
Do not stack X pixels at the frameedge
Sometimes original frames have artefacts on the edges of each frame (brighter/darker pixels), this option allows you to "forget" the edges when stacking. The value can be set from 0-10 pixels.
After setting all the parameters you want to use press STACK, based on the setting of the automatic processing you will either need to select the WAVELET page manually after stacking or will proceed automatically.