This is a very simple processing run for those people that never have used RegiStax and for those that need to get accustomed to the new way things are done in RegiStax 6.
Ive started by pressing the SELECT button, that opened a windows dialog. The dialog was first set to show AVI files (fileformats). After changing this I could choose an AVIfile to process. The screen below shows the 1st frame of that AVI-file.
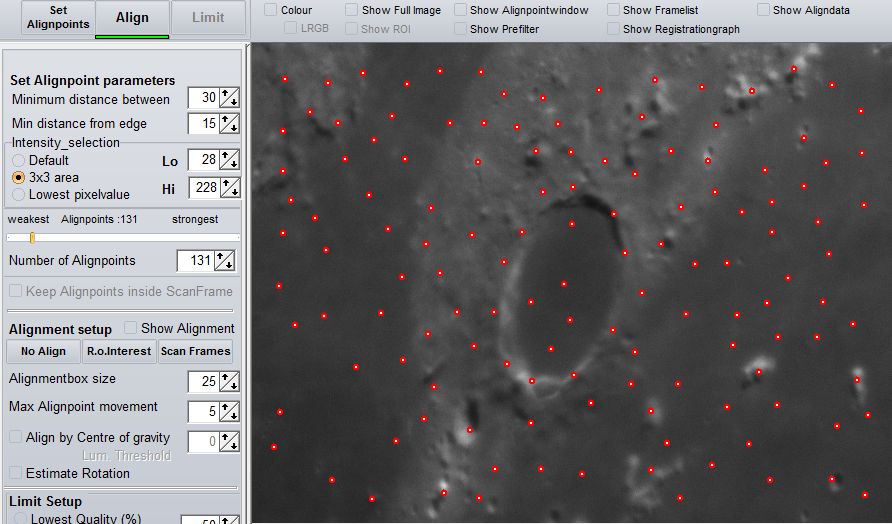
Next step is to set some alignpoints, Ive changed the minimum distance setting for alignpoints from 20 to 30 and left all other settings as they were and pressed "SET ALIGNPOINTS" which was marked with a green line below it. After SET ALIGNPOINTS was pressed the screen changed (see below) and showed a total of 131 alignpoints well spread over the image. The default settings for Alignment were kept and I then pressed the next button which now has a green line below "ALIGN"

Before pressing ALIGN I also had set the "SHOW ALIGNDATA" control to be able to inspect the results of Alignment in more detail. The image below shows the resulting screen. For each Alignpoint a yellow patch shows the movements (5x enlarged) as estimated for each frame. The red circles show if the movements are rather uniform (small circle) or strongly deviating (larger circles). When alignpoints deviate strongly you might reconsider using them. For the example below the results looked OK.
After inspecting the overall Alignment information I decided to reduce the number of frames I would use to stack. I moved the slider to a new position. When Show AlignData is active you will see for each alignpoint on each frame how the movement is compared to the original frame used at the start of alignment. In the image below the area on the left-top was moving away from the centre and rightside of the image. This is a clear sign of changing seeing-conditions during the recording. I then selected the best frame Limit method (left below) and pressed the LIMIT button.
After pressing LIMIT RegiStax advanced to the stacking page. The image below shows the default settings at that page. I did not change any of them and pressed the control with the green line under it "STACK"
This image shows the result of stacking 50 frames. Next I moved to the wavelet stage by clicking on the Wavelet-tab.
After arrival on the waveletpage I used the wavelet-sliders/filters (gaussian) to enhance the image. The result can be seen below.
