Processing Lunar AVI's Using RegiStax 5
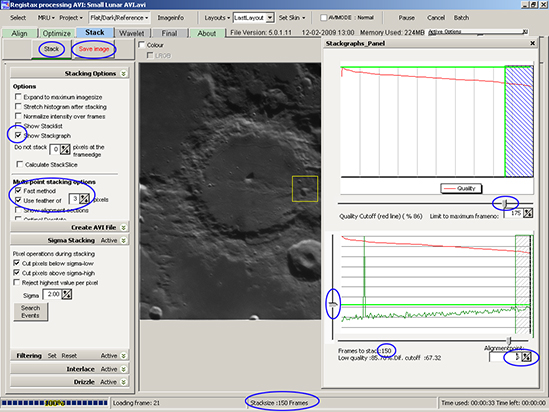
(by Bob Pilz)Stack Tab (figure
8)
General Settings
Under
Multi-point stacking options:
· Check Fast method. I’ve never found any
difference leaving this unchecked, and, as its name indicates, it is a lot
faster.
· For Use
feather of I find a value of 3
works well. This specifies the amount
of blending that occurs between adjacent APs so that no visible seam
will
exist.
Check
Show Stackgraph under Stacking Options. In the Stackgraphs
Panel I do the following:
· In the lower graph
I use the up/down arrow box under Alignpoint
to go through and examine the difference graph for each AP. I look for
two
things:
1. Does the
difference graph look “strange”? Is it abnormally spiky or have a large
“step”
somewhere in it? These indicate APs that didn’t align or optimize
correctly probably
due to an ill-defined feature and/or low contrast. I disable these APs
by
checking Show alignment sections under
Multi-point stacking options and
un-checking
that AP number in the Alignmentpoints
dialog box that pops up. I don’t typically see problems here, but it
needs to
be checked.
2. If the difference
graph for an AP shows a few larger vertical spikes, the frames causing
them can
be removed from that AP’s stack. Use the vertical slider to the left of
the
graph until the horizontal green line covers the spikes. Using the
slider to
eliminate many/most spikes seems like it should be a good thing, but I
have not
found it to be useful, so I just eliminate the very worst ones.
· Factors such as
the specific camera used, gain setting, sharpening workflow, etc.
determine how
many frames for a given AVI need to be stacked together to sufficiently
reduce
noise in the final image. Based on experience, I generally have a rough
idea of
how many frames I will need, but I find it best to stack different
numbers and
then later after further post-processing determine which gives the best
final
image.
So at this point,
I use the slider at the bottom of the top
graph to globally set the number of frames to be stacked at each AP. In
this
example I’ve set the number to be 150 which then gets reflected in the
number
shown for each AP. Then click on Stack.
After stacking completes, click on Save
Image. I save the image as a PNG file. It doesn’t matter as
long it is
saved in a format that supports 16-bit images.
· I repeat the above
step by changing the upper slider to smaller and smaller stack sizes
and saving
each result for later use.
As an aside, a
realistic example would be limiting the number of frames after align to
450.
Then in stacking, I would stack 400, 300 and 200 frames and save the
results
for each. The difference between 450 and 400 is a cushion to allow
using the
difference slider for an AP to reduce “spikiness” and still end up with
at
least 400 frames available.

